Instruments
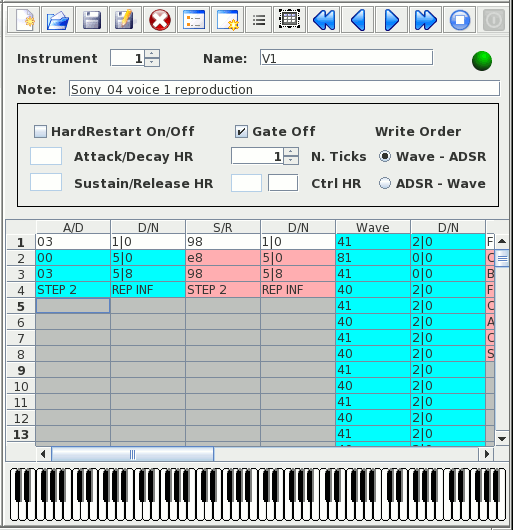
You have many functions that are available from icons or menu:

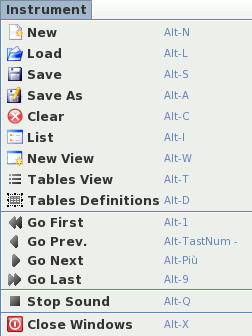
- New Position the instrument for editing the first instrument that has not a name. If you naming all your instruments, this is equivalent to have a new instrument
- Load Load an instrument from a file
- Save Save the instrument to file
- Save as Save the instrument with a new name
- Clear Clear the current instrument
- List List all the instruments with their name and description
- New view Open a new windows for editing another instrument
- Tables view Show the values of sid registers at each irq tick for this instrument.
- Tables definitions Show the tables where you can define the values that are used inside the instrument. In red is colored the value that is actually used into the instrument
- Go first Go to the first instrument
- Go prev. Go to the previous instrument
- Go next Go to the nest instrument
- Go last Go to the last instrument
- Stop sound Stop the sound. Sound is activate when you play with the instrument piano
- Close window Close this window
Instrument List
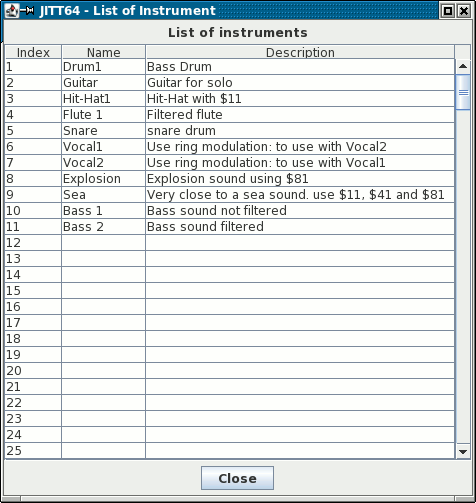
Here is showed all the instruments with their name and description, so you can easy choose the one you want to use. You can drag and drop one instrument to another position for easy rearrange the order of them. Note that even the instruments in patterns are changed to reflect this situation. Double click on a row to select the instrument. Use the Close button to close the window without and action
Tables of View
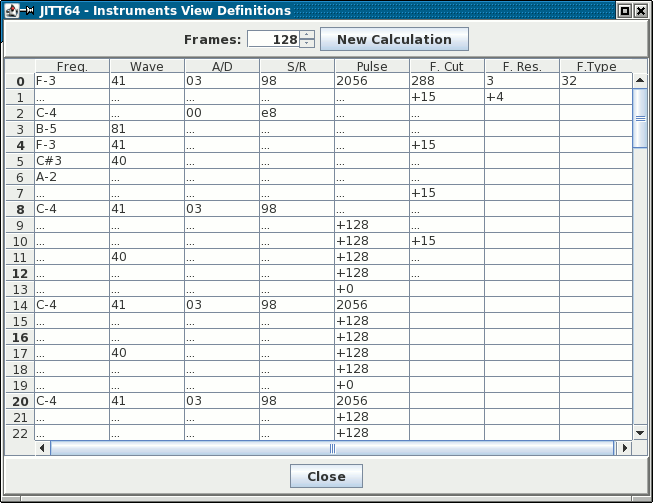
This panel shows all the values that will be put into the sid registers at each frames with the actual instrument definitions. Values are:
- Freq. Frequency (notes)
- Wave Waveforms (control register)
- AD Attack/Decay
- SR Sustain/Release
- Pulse Pulse values for waveform $41
- F. Cut. Filter cut-off frequency
- F. Res. Filter resonance
- F. Type Filter type
Tables of values
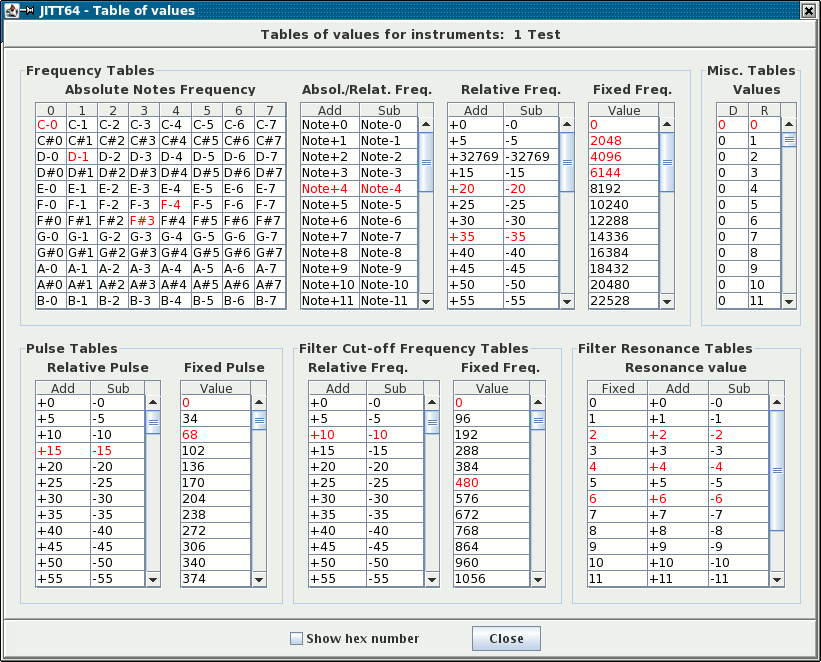
Using the Tables definition icon/menu command, the above dialog screen is open.
Inside it there are the 10 tables used in instrument definitions (values that you can insert into the instrument main tables by activating the appropriate right-click menu).
The element colored in red means that they are used inside the instrument and so changing their values will change even the instrument actual definitions. The tables are filled with some pre-build pattern, but you can change their values as you want (except for the hard-coded into the player ones):
- Frequency Tables
- Absolute Note Frequency
Absolute notes hard-coded into the player. There are 8 octave of notes into the table. Common meaning for C,D,E,F,G,H,A,B and # - Absol./Rel. Freq.
Relative value for absolute note. This are hard-coded into the player. You can have 0..31 values to add or subtract from current note - Relative Freq.
Relative frequency to add or subtract from current frequency. All these values can be changed. Valid values range from 0 to 32767 - Fixed Freq.
Fixed frequency to put into the sid frequency registers. All these values are free to changes and range from 0 to 32767
- Absolute Note Frequency
- Misc. Tables
- Values D/R
Delay/Repeat values with tick resolution. All are free to be changed and go from 0 to 255
- Values D/R
- Pulse Tables
- Relative Pulse
Values for pulse to add or subtract from current value. All are free to be changed and go from 0 to 4095 - Fixed Pulse
Fixed value to put for pulse. All are free to be changed and go from 0 to 4095
- Relative Pulse
- Filter Cut-off Frequency Tables
- Relative Freq.
Values for filter cut-off frequency to add or subtract from current value. All are free to be changed and go from 0 to 2047 - Fixed Freq.
Values for filter cut-off frequency to be putted into sid registers. All are free to be changed and go from 0 to 2047
- Relative Freq.
- Filter Resonance Tables
- Resonance value
Resonance value to be added, subtracted or putted into sid register. Values are hard-coded into the player.
- Resonance value
Restart of note

There are tree kind of methods you can choose:
- Never use an action
If you did not check the Hard Restart and Gate off fields, no action is taken when a new note start (so, all is left to you for preventing ADSR bugs). - Gate off
If you check the Flag off field, then the gate bit of sid register is released before the end of the note. How many ticks before this happen is given by the number you inserted into N. ticks. Read the notes below for more information about this. - Hard Restart
If you check the Hard Restart field, then those actions are taken before the end of the note (even here using the N. ticks for the timing):- Attack/Decay HR value is put as Attack/Decay when is time to start the HR
- Sustain/Release HR value is put as Sustain/Release when is time to start the HR
- First Control HR value is put as Control when is time to start the HR
- Second Control HR value is put as Control when there is the last tick before the new note comes
- Pattern Timing 5, Number of ticks 2: effective ticks are 2
- Pattern Timing 5, Number of ticks 4: effective ticks are 4
- Pattern Timing 3, Number of ticks 4: effective ticks are 3
The last choice you have (but that affect all the actions for this instrument) is the order you want that sid registers will be written:
- Wave - ADSR Wave register is writing before Attack/Decay/Sustain/Release
- ADSR - Wave Attack/Decay/Sustain/Release are writing before the Wave register
If you are wondering how to obtain and hard restart that use the test bit, you have two ways:
- Use Hard Restart features, setting AD/SR to use into HR, then make the first control register with the gate bit released. The second one need to be $09 (test bit + gate on). Use at least 2 ticks and set write order as ADSR-Wave
- Use Hard Restart features, setting AD/SR to use into HR, then make the first and second control register with the gate bit released. Use al least only one ticks. Then into the fist row of instrument table, set ADSR as you want for your instrument and the first wave as $09 (test bit + gate on). Set write order as ADSR-Wave. After this you will start the wave you need for your instrument.
Tables for instruments
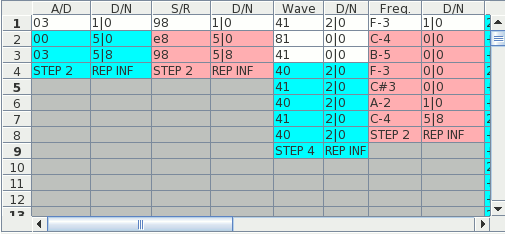
Couple of column and differentiated by having two different colours.
You can add a new column using the ins key and remove one using the Canc key.
With the right click of the mouse in a column, you open a sub menu for enter values.
- D/N Delay/Number of Repeat (sometimes called D/R)
This is common to all the couple of columns. With the first number you specify how long will take the delay between two commands to be executed. The second number specifies how many times the command will be executed in sequences.
Example:
- 0|0 the most used: no delay and no repeat The command is executed into one tick)
- 2|0 Command has a delay of 2 ticks after his execution (and no repeat, so next command will start after 3 ticks)
- 2|3 Command has a delay of 2 ticks after his execution, but then it is repeated for 3 times. So the next command starts after (2+1)*(3+1)=12 completed ticks.

- AD Attack/Decay
Here you can specify the attack/decay to use for the instrument. Values goes from $00 to $FF and are to be insert in hex. - SR Sustain/Release
Here you can specify the sustain/release to use for the instrument. Values goes from $00 to $FF and are to be insert in hex. - Wave
Here you can specify the wave (control register) to use for the instrument. Values goes from $00 to $FF and are to be insert in hex. - Frequency
Control the frequency (notes) to put into sid registers. The right-click menu contains four options:
- Insert absolute note
The table that is opened contains all the 8-octave notes you can use. Them are hard-coded into the player so you cannot change the frequency for one note. - Insert relative note
In the table that is opened there are relative values to add or subtract from the note the instruments was activated by the pattern that is using the instrument. It is always related to notes in the pattern, for example if you use an absolute note of the case above, this is not the note used for adding or subtracting the value. Those values are hard-coded into the player and cannot be varied. They varied from 0 to 31 so about +/- 2,5 octave from the note of the pattern. The value of Note+0 is to use if you want to maintain the actual note played by the pattern. - Insert relative frequency
In the table that is opened you can choose relative values of frequencies to add or subtract from current frequencies the sid was used. Value of +/- 0 can be used for taking the actual frequency the sid is working. This command can be used for creating vibrato or portamento at the instrument level. The values to add/subtract go from 0 to 32768 and you can change them using the Tables view icon/menu command. - Insert absolute frequency
In the table that is opened you can choose fixed values of frequencies to put directly into sid register. The 0 value is useful if you want to play silent. The values go from 0 to 32768 and you can change them using the Tables view icon/menu command.
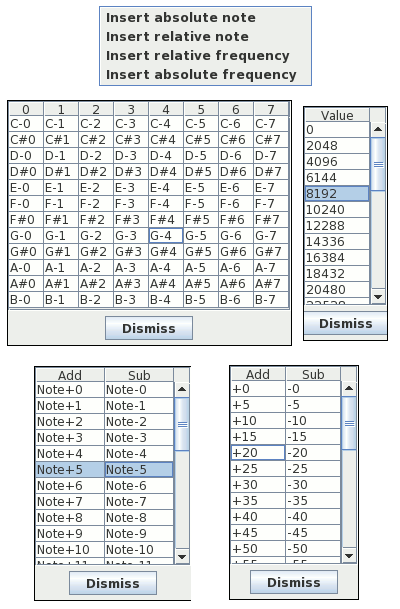
- Insert absolute note
- Pulse
Control the pulse generation for $41 waveform. The right-click menu contains two options:
- Insert fixed pulse value
With this it is open a sub-table where you can choose the fixed values (from 0..2048 that you can change using the Tables view icon/menu command) that are to be putted into pulse registers of sid. - Insert relative pulse value
Whit this it is open a sub-table where you can choose the relative (positive or negative) value to add/subtract from current value of the pulse registers. Values can be varied using the Tables view icon/menu command)
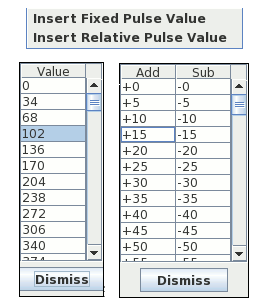
- Insert fixed pulse value
- Filter Cut-off
Set the filter cut-off frequency. The right-click menu contains two options:
- Insert relative frequency
With this it is open a sub-table where you can choose the relative cut-off frequency to add/subtract from the current value. You can change the values using the Tables view icon/menu command). - Insert absolute frequency
Whit this it is open a sub-table where you can choose the absolute frequency to put inti sid registers. Values can be varied using the Tables view icon/menu command)
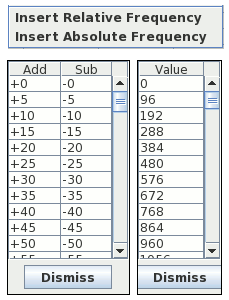
- Insert relative frequency
- Filter Resonance
Set the filter resonance value. The right-click menu contains one option:
- Insert value
With this it is open a sub-table where you can choose:- Fixed value of resonance to put to sid register
- Value to add to current resonance
- Value to subtract to current resonance
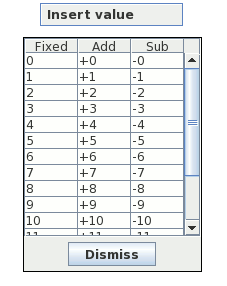
- Insert value
- Filter type
Set the filter type to use and the voices where apply filter. The right-click menu contains one option:
- Insert type
In the dialog that it is opened containing checkboxes, you can choose:- High pass filter
- Band pass filter
- Low pass filter
- Filter active in voice 3
- Filter active in voice 2
- Filter active in voice 1
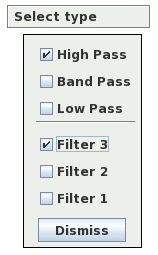
- Insert type
- Common part
At each right-click in a column different by D/N, the first two option available are:
- Set step to here It takes the position where you right-click the one for repeating the sequence of commands where the last is executed. You will see that all the commands that repeats are now colored (look at S/R in the image).
- Set no step It remove the position for repeating sequence, and so when the last command is executed, no one for this column will be performed by the player, until the instrument restart by tracker command (look at the Wave in image).


Piano roll

In the bottom part of the instrument panel there is the piano roll. With this you can play some notes with the setting on your instrument to test it. Click in the key you want to play.
Note that when you change some parameters of the instrument, JITT64 has to re-compile the player in order to be able to play with the instrument. This can require some times, so in the instrument panel there is a semaphore that can help you:
-
 Red semaphore: instrument is not well defined and cannot be used
-
 Yellow semaphore: instrument is correct and compilation is being done in
background
-
 Green semaphore: instrument can be used with the piano roll