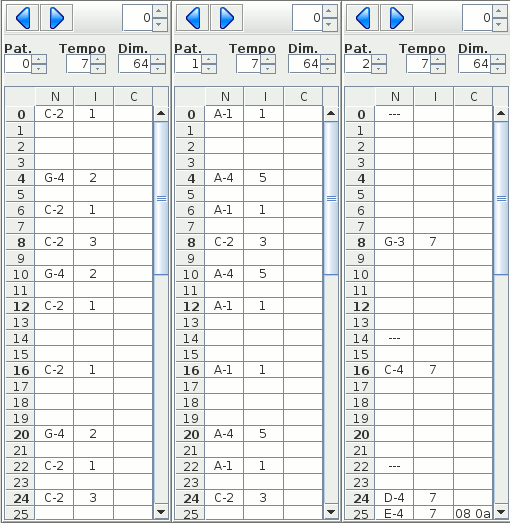
Pattern
You have 3 pattern panels into the application, so you can edit the patterns of 3 voices at the same time.
There are some functions that are activated by icons into the panel:
- Previous pattern: Go to previous pattern
- Next pattern: Go to next pattern
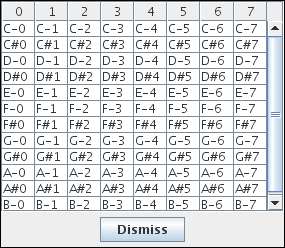
- Actual octave: Select actual octave to use for keyboard notes entry
- Pattern: Select current pattern to edit
- Time: Select the main time used by the pattern
- Dimension: Select the pattern dimension
Right-Click Menu
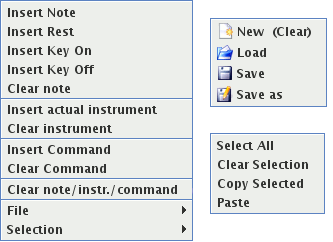
- Insert note: you can insert one notes using the pop-up dialog.
Notes that the current instrument is automatically inserted into the
pattern when you insert a note.
- Insert rest: This will insert a rest (sound frequency=0) into the pattern
- Insert key on: This will make gate on
- Insert key off: This will make gate off
- Insert actual instrument: insert the instrument selected into the instrument panel to the pattern
- Clear instrument: Clear the instrument that is inserted into the pattern
- Insert command: insert one command. A special pop-up menu will be opened. Look below for a detail description.
- Clear command: clear the command into the pattern
- File->New (clear): Clear all the pattern
- File->Load: Load the pattern from file
- File->Save: Save the patten to file
- File->Save As: Save the pattern to file
- Sel->Select All: Select all in pattern
- Sel->Clear Selection: Clear all in the selection
- Sel->Copy Selected: Copy al in the selection
- Sel->Paste: Paste from the current position
Commands
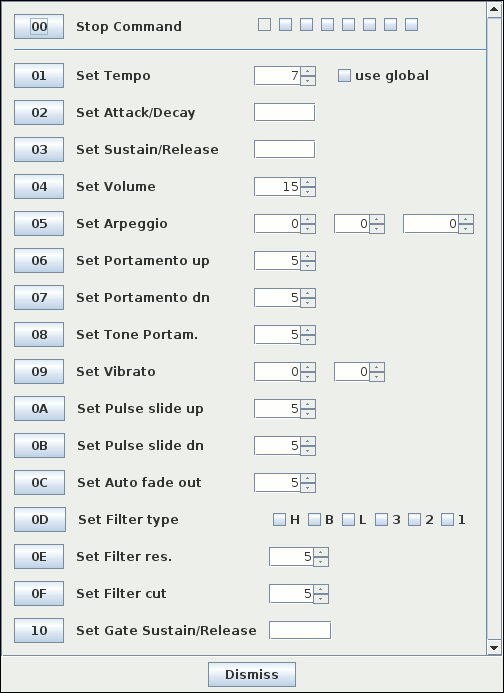
- 00 - Stop Command
This command will stop the execution of the commands you choose. If no commands are selected, this is equivalent to have no commands
Remember that when a command is activated, it runs until it is stopped
There are 8 checkboxes that are associated with a command: if you click it, than that command will be stopped. A tool tip text will show you the meanings of each checkbox, but starting from left, we have:
- Not used (disable)
- Stop pulse slide down
- Stop pulse slide up
- Stop vibrato
- Stop tone portamento
- Stop portamento down
- Stop portamento up
- Stop arpeggio
- 01 - Set Tempo
Set the new tempo that are to be executed from this position
You can choose from two options:
- Use global that will use again the global pattern tempo that is associated with the pattern (activated by selecting the checkbox)
- Use tempo that is inserted into the spinner (tempo goes from 3 to 64)
- 02 - Set Attack/Decay
Set the attack/decay value to use for instruments into this position (the inserted number must be into hexadecimal format)
- 03 - Set Sustain/Release
Set the sustain/release value to use for instruments into this position (the inserted number must be into hexadecimal format)
- 04 - Set Volume
Set the global volume to use for the song. You can use this for creating fade in/out effect to your music
- 05 - Set Arpeggio
With this command you can set an arpeggio with the actual note of pattern and two more notes, with some different speed:- With the first spinner you can choose the speed (from 0 to 3) of the arpeggio
- The second spinner is the number of tones to add to current note (from 0 to 7)
- The last spinner is the number of tones (from 0 to 7) to add to the note of the second spinner
- 06 - Set Portamento Up
You can insert the amount (from 0 to 255) multiplied by 2 of frequency to add to current for having a portamento effect
- 07 - Set Portamento Down
You can insert the amount (from 0 to 255) multiplied by 2 of frequency to subtract to current for having a portamento effect
- 08 - Set Tone Portamento
You can insert the amount (from 0 to 255) multiplied by 2 of frequency to add/subtract from current frequency for reaching the note that is inserted into the pattern.
- 09 - Set Vibrato
With this command you can create a vibrato effect for the note that it is played:- The first spinner is for setting the speed (from 0 to 16) of the vibrato effect
- The second spinner is for setting the amount of frequency to use for the vibrato effect. Notes that the amount will be multiply for 16 before being used by the player
- 0A - Set Pulse Slide Up
With this command you can set the amount of pulse pitch to add to current at each ticks. In the spinner you can set a value from 0 to 255
- 0B - Set Pulse Slide Down
With this command you can set the amount of pulse pitch to subtract to current at each ticks. In the spinner you can set a value from 0 to 255
- 0C - Set Auto Fade Out
With this command you can set the delay for an automatic volume fade out. In the spinner you can set a value from 1 to 255
- 0D - Set Filter Type
With this command you can select the type of filter and the voices that use it:- H High pass filter
- B Band pass filter
- L Low pass filter
- 3 Filter in voice 3
- 2 Filter in voice 2
- 1 Filter in voice 1
- 0E - Set Filter Resonance
With this command you can select the filter resonance (from 0 to 15) to use in filter setting
- 0F - Set Filter Cut Frequency
With this comamnd you can set the upper (*8) cut off frequency of filter
- 10 - Set Gate Sustain/Release
Set the sustain/release value to use for instruments into this position (the inserted number must be into hexadecimal format). This differs from 03 command because the gate is cleared before do this (after that the gate follow the rules is was done by instrument/other commands). You are so able to set a sustain value that are bigger to the current one